I've been meaning to share this sample of my Bloomsbury Quilt pattern with you for awhile now. It's a very late gift for a friend of mine who got married last fall. I used mostly Cotton & Steel fabrics with some Carolyn Friedlander prints mixed in. I hope my friend likes the bright and scrappy look!
I used some Essex yarn dyed linen in two different colors for the background fabric, which probably doesn't surprise you since I use it all the time! I just love the extra texture and softness it gives to a quilt.
It's quilted in a loose crosshatch pattern, which was kind of a pain to mark on the quilt (I used a hera marker as usual) but I'm happy with how it looks finished.
It's bound in a favorite green Cookie Book print by Kim Kight, and backed in a pretty teal print from Carolyn's Doe collection.
You can find the Bloomsbury Quilt pattern in my shop, here!
Showing posts with label lovely patterns. Show all posts
Showing posts with label lovely patterns. Show all posts
13
 Caravan Tote & Pouch.
3.06.2015
I've been meaning to share a post about my trip to Austin for QuiltCon, but haven't had a chance to go through all my photos yet. So in the meantime, I'll post about the bag I made to take with me!
Anna asked me to test out her new knitting bag pattern, the Caravan Tote. A cute bag with hardware and metal zippers and places to store knitting needles and notions? I said yes of course. The timing was perfect too, because it meant I'd have a new bag for QuiltCon.
Anna's patterns are always so nicely designed and easy to follow and this one is no exception. It all went together easily after cutting out all the pieces and interfacing. I had to wait until I got home to install the snaps, but they make the bag and pouch really look finished and professional.
I had several people ask me if I made my bag at the show, which is a win for me! It's always my goal to make things that don't really look handmade. The straps also held up pretty well, even after carrying about a billion pounds around on my shoulder all weekend.
The pouch is perfect for holding WIPs, it's currently holding my Fluid Beanie made with SpunRightRound's Graffiti Overlay. Which was given to me by Heather, who also happens to have collaborated on this pattern with Anna! Meant to be I think.
You can purchase the Caravan Tote pattern here. It's awesome and I highly recommend it!
30
 art student tote.
3.11.2013
After a year of procrastinating after buying the supplies in Atlanta last year, I finally made myself an Art Student Tote in time for QuiltCon. I've been in need of a larger laptop/carry-on bag for awhile now, and thought that with a few modifications, this bag would be perfect for me.
I made the Option B version of the bag, which features a top zipper panel to close the bag and make it larger if necessary. I made my panel about 4.5" tall, which is about half of what is recommended in the pattern.
The inside has lots of pockets for my laptop, notebooks, pens, etc.
Most importantly, it has a zipper closure on the top so I don't have to worry about my stuff falling out when I'm traveling. It's the perfect size bag to fit under the seat of an airplane, and holds my laptop, small purse, notebook, knitting or hand sewing project, water, and more with plenty of room to spare.
I had bought yardage of my favorite Melody Miller vintage flower print from her Ruby Star Rising collection from Whipstitch last year with the intention of making this bag with it. I decided to use it for the handles, accents, and lining rather than as the outer panels because I like to wear bags without a ton of prints on them. I bought some additional yardage of the print from Miss Matatabi and ended up having just enough to use for the bag. The main panels on the outside of the bag are made of yarn dyed Essex linen in Black, another of my favorite fabrics.
My favorite part about this bag is all of the hardware, which makes it look really professional! I used denim zippers and gold d-rings on mine.I made the Option B version of the bag, which features a top zipper panel to close the bag and make it larger if necessary. I made my panel about 4.5" tall, which is about half of what is recommended in the pattern.
The inside has lots of pockets for my laptop, notebooks, pens, etc.
Most importantly, it has a zipper closure on the top so I don't have to worry about my stuff falling out when I'm traveling. It's the perfect size bag to fit under the seat of an airplane, and holds my laptop, small purse, notebook, knitting or hand sewing project, water, and more with plenty of room to spare.
Most of the modifications that I made to the bag were to make it more durable as a carry-on tote, since the original pattern seems to be more intended as a purse. I made a list of all the interfacing information in case you'd like to replicate this durable carry-on version of the Art Student Tote. It was pretty simple to make aside from all the cutting and interfacing, but make sure to use a heavy-duty needle and go slow when sewing all the layers together, it's a lot of fabric to get through!
Outer panels: I used Essex linen for the outside with light woven interfacing (Pellon SF-101 ShapeFlex) fused to it, and then a layer of Pellon 987F Fusible Fleece fused to that.
Straps: My straps are made of a Kokka linen/cotton blend with ShapeFlex fused to it, and a layer of fusible fleece fused to that. When the straps are folded in half and sewn, this means each strap has 2 layers of woven interfacing and 2 layers of fusible fleece. I topstitched twice along each side of the handles for added durability, and stitched Xs on the top joint of each side of the handle.
Lining: Linen/cotton blend with canvas interfacing for added durability.
Inner Pockets: Linen/cotton blend with canvas interfacing so they stand up better on their own.
Extension Panel: I used linen with ShapeFlex fused to it for the outer extension panel, and linen/cotton blend for the inner panel.
Pull Tabs: Linen/cotton blend with ShapeFlex fused to it.
Cross Straps on top of outer zippers: Linen/cotton blend with ShapeFlex fused to it, plus a layer of canvas inside.
Bottom Support: Two layers of Peltex between outer bag and lining.
I highly recommend this pattern if you're looking for a stylish large carry-on bag for traveling! I've traveled with it twice so far and I know it's going to get a ton of use!
Labels:
lovely bags,
lovely designs,
lovely patterns
10
 Pattern Review: {LBG Studio} Accent Fold Over Pouch
12.03.2012
Hello! Happy Monday! After a week of sickness, I am glad to say that I'm on the mend. Sorry for the silence! Today is my stop on the Happy Little Pouch Hop! I'm excited to share the new fold over pouch that I made yesterday and talk a little bit about the Leather Accent Fold Over Pouch Pattern from LBG Studio.
In short, this pattern is awesome! Honestly, I've made a ton of pouches in my day and this is the best, most professional looking one I've made so far. Vanessa gives some really helpful hints in order to make your pouch look really great, and to make the zipper tabs on the ends look really clean when it's finished.
I'm sure you all know by now that photography is really important to me, and the pictures in this pattern are perfect! Between the pictures and the detailed instructions, I had no problems figuring out what I was supposed to do during each step. It only took me about an hour to put mine together, and I was taking my sweet time! :) I think a beginner could very easily make one of these pouches by following the pattern as well.
One of the things I like best about this pattern is that the design is very cute and on trend at the moment. It's a clutch that I could see myself actually taking out with me, which honestly doesn't happen very often! I prefer handmade items that don't actually look "handmade" if you know what I mean? This clutch definitely fits that criteria thanks to Vanessa's pattern!
For my pouch, I used a linen Kokka print called French Labels in Blue, a gold metallic faux leather that I got years ago, and Palm Springs in Uptown from Jay McCarroll's Center City for the lining. I used a mid-weight twill for the interlining.
If you want to join in on the Happy Little Pouch Hop, here's the schedule!
Monday 11/26: Emily from Mommy's Naptime and Elaine from Dashasel Sews
Tuesday, 11/27: Courtney from Mon Petit Lyons and Lucy from Charm About You
Wednesday, 11/28: Hollie from Undercover Crafter and Katie from Katie's Korner
Thursday, 11/29: Lindsay from Lindsay Sews and Michelle from I Like Orange
Friday, 11/30: Sara from Sew Sweetness, Cindy from Adventures of the Singing Quilter, and Jennifer from Ellison Lane Quilts
Monday, 12/3: Holly from Bijou Lovely and Heidi from Fabric Mutt
Tuedsay, 12/4: Elizabeth from Don't Call Me Bets and Emily from Mle BB
Wednesday, 12/5: Shruti from 13 Woodhouse Road and Liz from Dandelion Daydreams
Thursday, 12/6: Beth from Plum and June and Kaelin from The Plaid Scottie
Friday, 12/7: Emily from Mommy's Naptime and Elaine from Dashasel Sews
Please join us in the fun and share your pouches in the Flickr group. At the end of each week there will be some great prizes to award!
5
 Lucy's Crab Shack Colorblock Quilt Kit.
6.30.2012
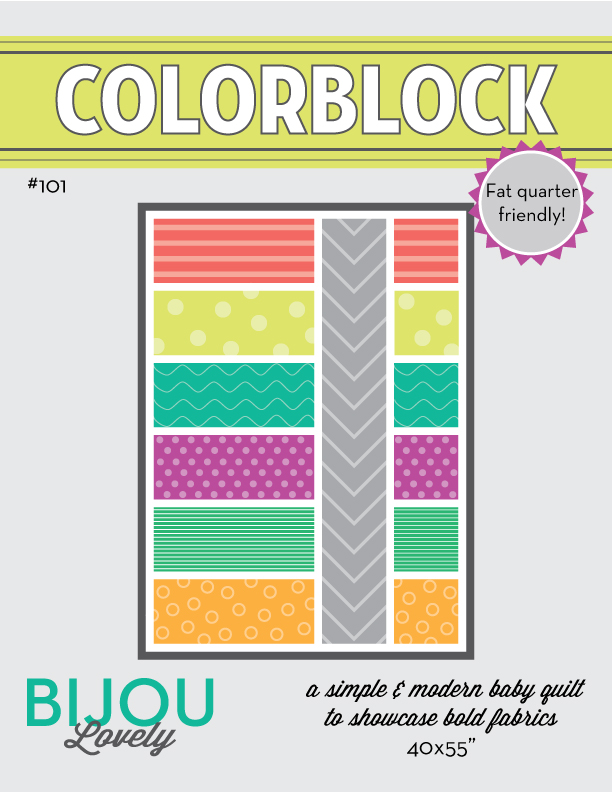
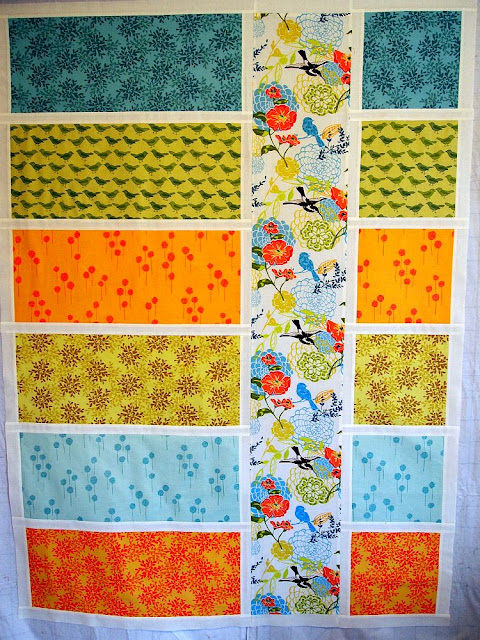
Hope you're all having a nice weekend! Just wanted to let you all know that CityCraft has made some kits of Lucy's Crab Shack to use with my Colorblock Quilt Pattern! These fabrics would make an adorable quilt for summer!
You can purchase the kit for $35 here.
15
 go anywhere bag.
6.14.2012
Tomorrow I'll be posting a review of the Go Anywhere Bag Pattern on Sew Sweetness, so today I wanted to share pictures of the finished product here.
I used fabrics from Botanica by Lourdes Sanchez for the exterior and lining, with linen exterior pockets and gray Lisette chambray for the interior pocket and piping.
The back pocket is really big and closes with a magnetic snap. My iPad fits perfectly in it.
I added one of my new labels to the interior pocket. I love the way the white looks on the gray pocket!
There are three pockets in the front, perfect for my sunglasses, phone, and keys! The pleats are really cute.
I'm really happy with my fabric choices for the bag, these fabrics are very "me". I originally thought about selling the bag when it was finished, but now I can't bear to part with it!
Make sure to stop by Sara's blog tomorrow for my review of Anna's pattern. Stop by here too, I'm going to be having a little giveaway to celebrate :)
Labels:
lovely designs,
lovely patterns
13
 Colorblock quilts.
4.25.2012
Thank you so much to everyone who has purchased my Colorblock Quilt Pattern! I really appreciate your support.
Today I wanted to share some of the Colorblock quilts that my pattern testers made. I had planned on writing this post last week, but ran out of time before we headed off to San Francisco for a long weekend, so I apologize for the delay. I cannot thank my pattern testers enough, they've been so great throughout this process and really helped me to refine the pattern directions to make them clear and easy.
Here's a quilt from Megan of Notes from the Bench. I love the mix of contrast between the blocks!
Jamie of Busy Bee Quilts used Hello Pilgrim prints for her quilt, it looks so beautiful!
Erica of Happy Fabric made this fun quilt, I love the red binding!
Jen used some bold colors and graphic prints, it looks great!
Marcia of Little Pink Rose Quilting & Sewing made this pretty floral version. So springy and cute.
Shanna of Sweet and Sassy made this space quilt, perfect for a boy!
Marti of 52 Quilts in 52 Weeks used some Valori Wells fabric, I love the color combo here and how well it coordinates with the column print.
Suzanne of Class Creations made this sweet girl version. I love the use of the Children at Play panel with a border for the column. Very clever!
This pretty quilt is from Brittney of Brittney Selby Quilting. The brown sashing is perfect with these prints.
Ella of throw a wench in the works made this cute rainbow version. I'm always a sucker for rainbows.
Colby of sew.quilt.explore. made this colorful version, and even tried out some wavy quilting on it!
Ramsey made this gorgeous version. Again, I love the colors here!
Last but not least, Mandi made this fun lime and black quilt. Stripes are always a great choice for the column fabric!
Thanks so much to all of my pattern testers! You all did a fantastic job :)
23
 Colorblock Quilt Pattern now available!
4.18.2012
The long-awaited Colorblock Quilt Pattern is finished! You can purchase it in my new pattern shop!
The pattern features tons of cutting and assembly diagrams to help you make this 40 x 55" baby quilt, along with helpful tips to make the process even easier. Purchasing the pattern also gives you a license to sell any colorblock quilts you've made on a home-based production level.
I have lots of pattern testers to thank for helping me make sure the pattern was easy to understand. I wanted to make sure it was just as easy for beginners as it is for more experienced quilters! Tomorrow I'll share some of the gorgeous quilts that were made by my testers.
Here are the two quilts that I've made using this pattern. One for a baby boy...
and one for a baby girl.
This quilt is seriously so fast and easy to make! The pattern is available in PDF form and will be emailed to you immediately after purchase. If you have any questions, please don't hesitate to contact me!
9
 thank you!
4.02.2012
I just wanted to write a quick post to say thank you to all of you who volunteered to test my Colorblock Quilt pattern! I tried to find a good mix of beginner, intermediate, and advanced sewists, and there were lots of you in every category! There will definitely be more patterns to test in the future, and I will always come here first for pattern testers so there will be more opportunities if you missed out this time.
We have a record for the fastest pattern tester to ever finish I think, Marti from 52 Quilts in 52 Weeks. I contacted her this morning with the pattern, and she already sent me a picture of her finished quilt top!
I cannot explain how happy it makes me to see other people make this quilt! Marti used fabrics from Valori Wells (Nest and Wrenly lines, I think?), and they make for such a happy springy quilt, I absolutely love it!
Subscribe to:
Posts (Atom)


 Welcome to Bijou Lovely. This blog is named after my great grandmother, Bijou Lillian, who encouraged me to embrace all the lovely things that the world has to offer. I hope to provide you with inspiration for sewing, quilting, photography, design, and daily life here at Bijou Lovely! It's truly lovely to have you here.


